Introduction
Defining Exception handlers in your task flows is not only a good practice of ADF development.
Ignoring this practice can get you in some big problems, you will get unpredictable and difficult for understanding behavior of the system like Null Pointer Exceptions in trusted places or system's hanging.
Some time ago I faced a "performance" problem of ADF application. About a hundred of users (it's not too much load for that environment) were working with the system and it "hanged" every 20 minutes. A lot of performance tunings didn't help. There was a bug. One important Task Flow didn't have an exception handler.
Experiments
Let's say we have very simple bounded train task flow:
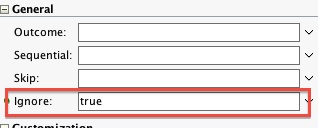
 The task flow is executed as a region within some jspx page and it doesn't have an exception handler. NextView page fragment has the following source:
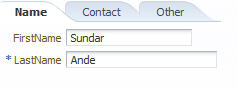
And it looks like this:

Managed bean method for BadCall activity has the following code:
In this example the situation is not very dangerous. We will just get the unsupported exception window like this:

But the system is still stable and is working correctly. We can click Back button, we can navigate using af:train at the top of the page. Andrejus Baranovskis explained in his blog how to define exception handler for the task flow to make the exception be caught and rendered correctly.
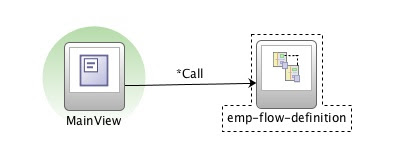
In the next experiment let's call our task flow from another one. So, let's make it inner.
In this scenario the same Arithmetic exception will crash the system. If we try to click Back button after the exception window, we will get Null Pointer Exception. Why???
The reason is in the controller's exception handling mechanism. In case of an exception during navigation within task flow it tries to find and execute an Exception Handler of the current task flow. If the current task flow does not specify an exception handling activity then the task flow will be popped from the task flow stack and control passed to the calling task flow's exception handler. This process is continued until an exception handler is located or until all task flow's have been checked. So, in our example, when we don't have any exception handlers at all, our task flow (emp-flow-definition) is just popped out from the calling stack, control is passed to the calling flow, and the exception is thrown. That's why EL expression for Back button's action #{controllerContext.currentViewPort.taskFlowContext.trainModel.getPrevious}" will throw NPE. Current task flow at that moment is calling task flow, but we see the inner task flow on the screen. And off course calling task flow doesn't have any train model.
The situation is even worse. If we try to navigate using af:train, the system will hang!!! We will get a stuck thread!!! EL evaluator doesn't like when complex EL expression containing null values and it sometimes hangs instead of throwing exceptions like NPE. If we define any exception handler in our task flow the problem is gone. It even doesn't matter what it does. It is just needed by controller's exception handling mechanism.
Instead of adding exception handler to the inner task flow we can try to add it the calling task flow. And if this handler is just some method call activity without navigating to any View activity, we will face the same problem, because we will still see on the screen "dead" task flow.
So the solution is either to add any exception handler to the inner task flow or to add some handler with a navigation to a view activity to the calling task flow. But! The simplest and the most correct rule - don't have any task flows without exception handlers!
That's it.
Defining Exception handlers in your task flows is not only a good practice of ADF development.
Ignoring this practice can get you in some big problems, you will get unpredictable and difficult for understanding behavior of the system like Null Pointer Exceptions in trusted places or system's hanging.
Some time ago I faced a "performance" problem of ADF application. About a hundred of users (it's not too much load for that environment) were working with the system and it "hanged" every 20 minutes. A lot of performance tunings didn't help. There was a bug. One important Task Flow didn't have an exception handler.
Experiments
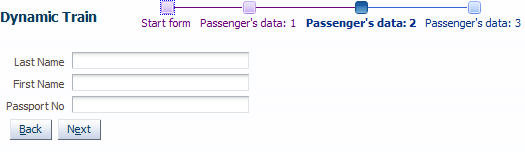
Let's say we have very simple bounded train task flow:

 <af:panelFormLayout>
  <af:group id="g1">
   <af:train id="pt_t2"
    value="#{controllerContext.currentViewPort.taskFlowContext.trainModel}"/>
   <af:commandButton text="Commit" id="cb1" action="*Commit"/>
   <af:commandToolbarButton text="Back" id="pt_cb1"
    action="#{controllerContext.currentViewPort.taskFlowContext.trainModel.getPrevious}"
    disabled="#{empty controllerContext.currentViewPort.taskFlowContext.trainModel.previous}"
    rendered="#{! empty controllerContext.currentViewPort.taskFlowContext.trainModel.previous}"
    immediate="true"/>

   <af:commandToolbarButton text="Forward" id="pt_cb2"
    action="#{pageFlowScope.WizzardFlowBean.nextButtonAction}"
    disabled="#{empty controllerContext.currentViewPort.taskFlowContext.trainModel.next}"/>
  </af:group>
 </af:panelFormLayout>
And it looks like this:
Managed bean method for BadCall activity has the following code:
    public void badCall() {
        int i = 1/0;
    }
In this example the situation is not very dangerous. We will just get the unsupported exception window like this:

But the system is still stable and is working correctly. We can click Back button, we can navigate using af:train at the top of the page. Andrejus Baranovskis explained in his blog how to define exception handler for the task flow to make the exception be caught and rendered correctly.
In the next experiment let's call our task flow from another one. So, let's make it inner.

In this scenario the same Arithmetic exception will crash the system. If we try to click Back button after the exception window, we will get Null Pointer Exception. Why???
The reason is in the controller's exception handling mechanism. In case of an exception during navigation within task flow it tries to find and execute an Exception Handler of the current task flow. If the current task flow does not specify an exception handling activity then the task flow will be popped from the task flow stack and control passed to the calling task flow's exception handler. This process is continued until an exception handler is located or until all task flow's have been checked. So, in our example, when we don't have any exception handlers at all, our task flow (emp-flow-definition) is just popped out from the calling stack, control is passed to the calling flow, and the exception is thrown. That's why EL expression for Back button's action #{controllerContext.currentViewPort.taskFlowContext.trainModel.getPrevious}" will throw NPE. Current task flow at that moment is calling task flow, but we see the inner task flow on the screen. And off course calling task flow doesn't have any train model.
The situation is even worse. If we try to navigate using af:train, the system will hang!!! We will get a stuck thread!!! EL evaluator doesn't like when complex EL expression containing null values and it sometimes hangs instead of throwing exceptions like NPE. If we define any exception handler in our task flow the problem is gone. It even doesn't matter what it does. It is just needed by controller's exception handling mechanism.
Instead of adding exception handler to the inner task flow we can try to add it the calling task flow. And if this handler is just some method call activity without navigating to any View activity, we will face the same problem, because we will still see on the screen "dead" task flow.
So the solution is either to add any exception handler to the inner task flow or to add some handler with a navigation to a view activity to the calling task flow. But! The simplest and the most correct rule - don't have any task flows without exception handlers!
That's it.